C2 Formatting text
Download PDF Version
1. Introduction

In just about every part of the admin system where you can enter text, you will see these text formatting icons, which allow you to bold, italic and underline text. They also enable you to list text in bullet points or numbers and insert an image you have already uploaded. And best of all, to convert text into a link, eg “Click here to contact me”, with the here linking through to your email or a web address. Here we show you how to use them.
2. How to bold, italic and underline
This is quite straightforward – just select the text you would like to format and click on the respective bold, italic or underline icon. You will see the system automatically adds some tags or html in the admin system, as you can see from the left image. This is in effect a code or web speak to format the text (see 6. below for a fuller explanation). To undo it, simply delete the tags. WARNING. Generally speaking we do not recommend underlining text, as users can mistake it for a link, so only use this facility if you really need to.
3. Bullet points and numbers
These work slightly differently. If you would like a list of text to appear in bullet points or numbers, position your cursor at the top of your list in a clear space and click on the respective icon. The system will add some tags (for numbers, you will get a pop up asking you which start number you would like – enter 1, or other start number if you prefer). For bullet points, the tags will look like this:
[list]
[/list]
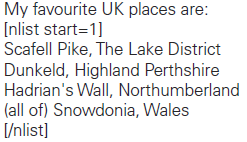
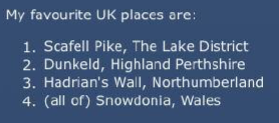
Just copy your text between the two tags and preview your site to see it in neat bullet point order. Please note if there is a line break between items in your list, the system will treat the break as a new item. For numbers, the tags will look like this: [nlist start=1] and [/nlist]. In the example below, we have four places listed in numerical format. The admin system would look something like the image to the left and the live site, like the image to the right.
4. Converting text into a link

Turning text into a link can be really helpful for your users. It looks professional and it can also help with search engines. For example, if you would like to say “There is an excellent article about this on the BBC website”, you can convert the words BBC website into a link, which goes directly to the article you’re referring to. Or, it could be to an email address. Or any other part of your own website, an ‘internal link’. Or even to a file that you may have already uploaded, such as a Word or Excel file. Even an image.
Stage I: Create the link. All you have to do is click on the link icon in the admin system. You will see a pop-up box like this. The most important thing is to select the Type of link you would like to make from the drop down menu, as follows:
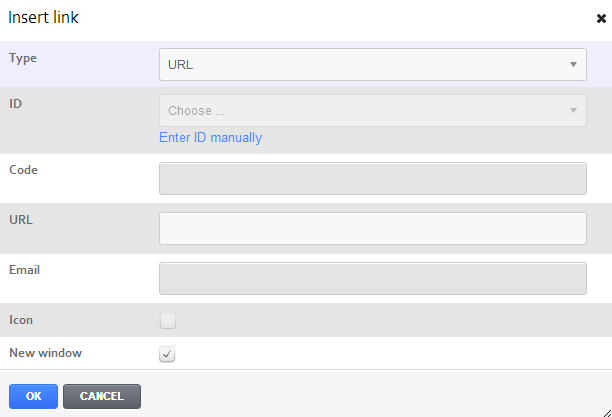
URL. When linking to a web page on a different website to your own. Just select URL in the Type field and under the URL field, enter the web page address you would like to link to, e.g. http://www.bbc.co.uk/sport. Click OK at the bottom and see Preview. Incidentally, URL stands for Unique resource locator.
Email. If you select email, then simply enter the email address you want to link to in the Email field. Click OK at the bottom and Preview.
Links to your own site, including file downloads. The Type you select here depends on what type of section you are linking to, either a Photo, Gallery, Article, Section, a file you have already uploaded, or a Popup section you have created. If you select one of these, you will also need to select which one from the drop down menu that appears under the id field (if this is an exhaustive list, you can alternatively select Enter ID manually* and enter the record id). Click OK at the end.
Incidentally, you can only tick Icon if you are linking to a file you have uploaded, in which case the system will show the icon of the type of file it is, eg Word or Excel.
Stage II: Edit the text. You will see that the system has added some coding to your admin system, as in the example below. Whilst this may look a bit scary, all you have to do is enter whatever text you would like to appear in the blue highlighted area. This is the text the user will see on your website, which if they click on will go straight to the link you have entered. Give it a go and click on Preview to see how it looks and works. If you need to re-do it, simply delete the coding in your admin system and start again. WARNING: When setting up links, it is important that those links are valid and kept up to date or else you will be penalised severely by Google!

5. How to insert an image

Inserting an image into text pages is a great way of brightening the page up and is easy to do. For this to work, you must have already uploaded the image to your admin system in the usual way and preferably taken a note of the unique image id that our system has generated (not to be confused with your own file name).
When you are ready, position your cursor in the admin system text field where you would like the image to appear. If it is to the right of the text, this should still be at the start of that text. Click on the Image icon (the green one) and complete the pop up box as follows.
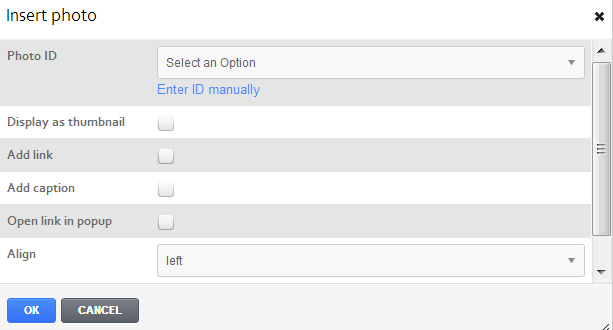
Image id. Select from the drop down list. If your list is exhaustive, take a note of the image id (found in the respective Image record) and click on Enter ID manually.
Display as thumbnail. Tick if you would like the image to appear as a thumbnail, otherwise it will be an enlargement.
Add link. If ticked and the user clicks on the image, they will be taken through to an enlarged version.
Add caption. If your image has a caption then it will appear here.
Open link in pop-up. A pop-up of the enlarged image appears.
Align. This defaults to left. Please note that even though the tags appear at the start of the text, if you select right align, the image still appears at the right of the text. Centre is rarely used unless you would like to insert an image in the middle of the field with no text wrapping around it.
Click OK and then Preview to see what it looks like.
Sizing an embedded imaged
In older websites, to reduce the size of the image you would typically resize the image before uploading or else use the thumbnail. In modern, mobile compatible sites, you can now use a larger image and rely on the browser to resize the image. This will give better resolution images on mobile devices.
To do this, add the image as above, and then in the “tag”, add a maxwidth attribute, e.g.
[image id="44" style="left" maxwidth="40%"]
Note we always in modern browsers add a maximum width and let the browser calculate the actual width.
6. Adding headings
You can can sub headings and cross headings in your text by using some “html”, the language for web pages.
The syntax is as follows:
<h1>Main heading<h1>
or
<h2>Second level heading<h2>
And so on down to from 1-6. Note that you should avoid using h1 within your text as it will affect your Google ranking. Use h2 and lower.
7. Adding a stand out panel
Simple panels can be added as follows. For more control you will want to add a full content section.
<div class='panel'>
Panel text here
</div>
7. Adding tables
Adding tables is covered in a separate guide, https://clikcraft.clik.com/admin/help.cfm?code=tables
